
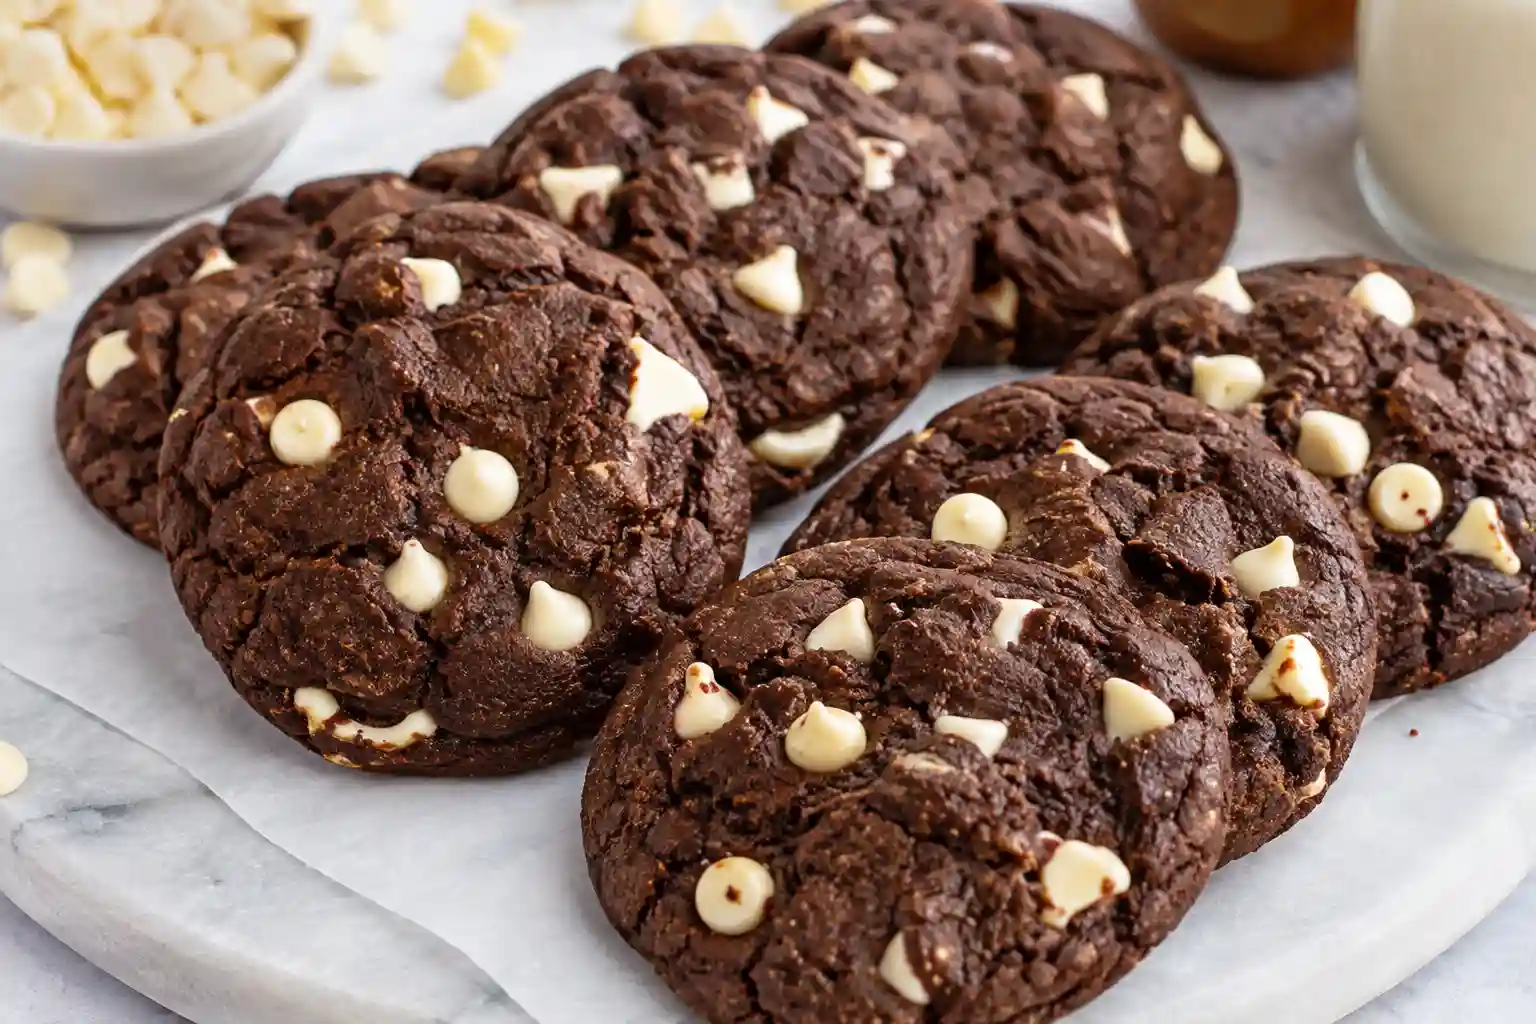
Chocolate cookies with white chocolate chips are essentially a brownie’s favorite cousin deep, fudgy cocoa flavor with pockets of sweet, creamy white chocolate running through every bite. They’re simple to make, a one bowl, no mixer required kind of cookie, but a few small details make the difference between a bakery worthy batch and one that spreads thin or loses its chips to scorching.
I’ll walk through the two things people run into most with this cookie: getting the right rise and thickness, and keeping those white chocolate chips creamy instead of burnt or melted away entirely.
Key Takeaways
- Natural cocoa powder paired with baking soda, not Dutch process cocoa, is what gives this cookie its proper rise and deep chocolate flavor.
- Chilling the dough for at least 30 minutes is the single biggest factor in keeping these cookies thick instead of flat and greasy.
- White chocolate chips scorch more easily than regular chocolate chips because of their lower melting point, so slightly lower oven heat protects them.
- Room-temperature butter that’s properly creamed, not melted or too soft, is what gives these cookies structure before the chips ever come into play.
- Baked cookies and raw dough freeze differently well both work, but they need slightly different handling.
What You’ll Need
- All-purpose flour
- Natural unsweetened cocoa powder not Dutch process this matters more than you’d think, more on that below.
- Baking soda
- Salt
- Unsalted butter, room temperature properly softened, not melted, so it can be creamed with the sugar for structure.
- Granulated sugar and light brown sugar the brown sugar adds moisture and a slight chew.
- Eggs, room temperature
- Vanilla extract
- White chocolate chips good quality chips hold their shape better in the oven than cheaper ones.
A Little History Behind This Cookie
Chocolate cookies with white chocolate chips are a direct descendant of the original chocolate chip cookie, just flipped in color. The chocolate chip cookie itself was invented by Ruth Graves Wakefield, who ran the Toll House Inn in Whitman, Massachusetts, and pioneered the very first chocolate chip cookie recipe, later selling the rights to her recipe and the Toll House name to Nestlé. You can read more about her on Ruth Graves Wakefield page.
This chocolate version simply reverses the classic formula: instead of a vanilla based dough studded with dark chocolate chips, the dough itself is chocolate, and the chips are white. It’s sometimes called an “inside-out” chocolate chip cookie for exactly that reason.
Equipment That Makes This Easier
- A stand mixer or hand mixer, for properly creaming the butter and sugar, which is where a lot of the cookie’s structure comes from.
- A cookie scoop, for evenly sized cookies that bake at the same rate.
- Parchment paper or silicone baking mats, so the cookies release cleanly and don’t pick up extra grease from a bare pan.
- A kitchen scale, if you want the most accurate flour measurement, since too much or too little flour is one of the most common causes of inconsistent cookies.
How to Make Chocolate Cookies with White Chocolate Chips
Mix the dry ingredients. Whisk together the flour, cocoa powder, baking soda, and salt in a bowl. Set aside.
Cream the butter and sugars. Beat the room-temperature butter with the granulated and brown sugar until light and fluffy, about 2 to 3 minutes. This step matters more than it looks like it should; it’s what traps the air that gives the cookie its structure.
Add the eggs and vanilla. Beat in the eggs one at a time, then the vanilla, mixing until fully combined.
Combine and fold in the chips. Add the dry ingredients to the wet mixture and mix just until no streaks of flour remain. Fold in the white chocolate chips by hand, reserving a small handful to press onto the tops of the cookies right before baking for a bakery-style look.
Chill the dough. Cover and refrigerate the dough for at least 30 minutes, up to 24 hours. This step firms up the butter so the cookies hold their shape instead of spreading thin in the oven.
Bake. Preheat the oven to 350°F (175°C) and line baking sheets with parchment. Scoop the chilled dough into balls, spacing them a few inches apart, and bake for 10 to 12 minutes, until the edges look set but the centers still look slightly underdone. They’ll continue to firm up as they cool.
Cool. Let the cookies rest on the baking sheet for 5 minutes before transferring to a wire rack. This short rest lets them finish setting without overbaking on a still-hot pan.
Why Does It Matter Whether I Use Natural or Dutch Process Cocoa?
This is a detail almost every recipe skips, but it’s the reason some chocolate cookies rise properly and others turn out dense or oddly flat. Natural cocoa is acidic, and baking soda is its chemical opposite, a base, so combining the two creates a reaction that produces the bubbles responsible for a cookie’s rise, according to King Arthur Baking’s guide to Dutch-process vs. natural cocoa. Dutch-process cocoa has had its acidity neutralized, so it doesn’t react with baking soda the same way, which is why recipes leavened with baking soda specifically call for natural cocoa. If you only have Dutch-process on hand, the cookies will still bake, just with a slightly different rise and a milder chocolate flavor.
Why Do My Cookies Spread Too Thin?
Flat, greasy cookies almost always trace back to one of a few things: warm butter, warm baking sheets, or not enough chilling time before baking.
| Problem | Likely Cause | Fix |
| Cookies spread thin and greasy | Butter was too soft or melted | Use properly softened, room-temperature butter, not melted |
| Cookies spread more with each batch | Baking sheets still hot from the previous batch | Let pans cool completely between batches, or use a second set |
| Cookies spread despite chilled dough | Chilling time too short | Chill at least 30 minutes; longer (up to 24 hours) gives even better results |
| Cookies are dense instead of chewy | Too much flour packed into the measuring cup | Spoon flour into the cup and level it off, or weigh it on a scale |
| Cookies didn’t spread at all, very puffy | Too much flour, or dough overchilled without resting | Let overchilled dough sit at room temperature 10-15 minutes before baking |
Why Did My White Chocolate Chips Scorch or Disappear?
White chocolate has a lower melting point than regular chocolate, which makes it more prone to scorching in a hot oven or breaking down into a greasy streak instead of staying in neat pockets. The lower melting point of white chocolate, combined with the stabilizers used in chip form, means it’s more prone to clumping or burning when exposed to high heat, which is part of why white chocolate chips behave differently in the oven than semisweet ones.
A few things help use good quality white chocolate chips rather than the cheapest option, since higher quality chips tend to hold their shape better under heat. Baking at a moderate 350°F rather than pushing the temperature higher also protects them, and pressing a few extra chips onto the tops of the cookies right before baking (rather than mixing all of them into the dough) keeps some visibly intact for that bakery-style look, since chips on the surface are less insulated by dough and brown rather than scorch.
Can You Make the Dough Ahead of Time or Freeze It?
Yes, and this cookie actually benefits from a rest in the fridge.
- Refrigerated dough: keeps well for up to 3 days; the flavor and texture actually improve with a day or two of resting.
- Frozen dough: scoop the dough into balls first, freeze on a tray until solid, then transfer to a freezer bag. Bake straight from frozen, just add 1 to 2 extra minutes to the bake time.
- Baked cookies: cool completely, then freeze in a single layer before stacking with parchment between layers to prevent sticking.
How to Store Chocolate Cookies with White Chocolate Chips
| Storage Method | How Long | Notes |
| Room temperature, airtight container | Up to 1 week | Best texture within the first 3 to 4 days |
| Freezer, baked cookies | Up to 3 months | Thaw at room temperature or warm briefly in the oven |
| Freezer, raw dough balls | Up to 3 months | Bake straight from frozen, adding a couple extra minutes |
| Refrigerator, raw dough | Up to 3 days | Let sit at room temperature 10-15 minutes before scooping if very firm |
More Chocolate Treats to Try
If chocolate is the mood, my ultimate chocolate layer cake and chocolate fudge cake both use that same natural cocoa approach for a deep, rich flavor. My dark chocolate cake recipe is another good pick if you want something even more intense to pair with a batch of these cookies for a dessert table.
For more cookie inspiration, browse the rest of my cookie recipes, or check out my bars and brownies if you’re in the mood for something a little more fudgy and less scoop-and-bake.
What to Serve Them With
These cookies are rich enough to stand alone with a glass of cold milk or a cup of coffee. For a dessert spread, they pair nicely alongside a lighter dessert like fresh fruit to balance out the richness. If you’re baking a big batch for a bake sale or gathering, a [cookie tin or storage container] keeps them fresh and makes transporting them much easier.
Frequently Asked Questions
Can I use Dutch-process cocoa instead of natural cocoa?
You can, but the cookies will have a slightly different rise and a milder chocolate flavor, since Dutch-process cocoa doesn’t react with baking soda the way natural cocoa does. For the best texture and flavor as written, stick with natural unsweetened cocoa powder.
Why did my white chocolate chips melt into the dough instead of staying in pockets?
White chocolate has a lower melting point than regular chocolate chips, making it more prone to breaking down under high heat. Using good-quality chips, baking at a moderate 350°F, and pressing a few extra chips on top right before baking all help keep them visibly intact.
Why are my cookies flat and greasy?
Flat, greasy cookies are almost always caused by butter that was too soft or melted, or baking sheets that were still warm from a previous batch. Chilling the dough for at least 30 minutes before baking is the most reliable fix.
Can I freeze the cookie dough?
Yes. Scoop the dough into balls, freeze them on a tray until solid, then transfer to a freezer bag for up to 3 months. Bake straight from frozen, adding 1 to 2 extra minutes to the bake time.
How long do these cookies stay fresh?
Stored in an airtight container at room temperature, they stay fresh for about a week, though the texture is best within the first 3 to 4 days. They also freeze well for up to 3 months, either baked or as raw dough.
Can I substitute milk or dark chocolate chips for white chocolate?
Yes, this dough works well with any type of chocolate chip. Just keep in mind that milk and dark chocolate chips have higher melting points than white chocolate, so they’re a bit more forgiving if you’re new to baking with chips.
Conclusion
Chocolate cookies with white chocolate chips are a simple, one bowl bake that rewards just a little attention to detail the right cocoa for a proper rise, chilled dough for the right thickness, and a gentler hand with oven heat to protect those white chocolate pockets. Get those three things right, and this becomes one of the most requested cookies in your rotation.
Chocolate Cookies with White Chocolate Chips
Notes
- 2 1/4 cups (280g) all-purpose flour
- 3/4 cup (65g) natural unsweetened cocoa powder
- 1 teaspoon baking soda
- 1/2 teaspoon salt
- 1 cup (226g) unsalted butter, room temperature
- 1 cup (200g) granulated sugar
- 3/4 cup (150g) packed light brown sugar
- 2 large eggs, room temperature
- 2 teaspoons vanilla extract
- 2 cups (340g) white chocolate chips, divided
- Whisk flour, cocoa powder, baking soda, and salt in a bowl. Set aside.
- Beat butter, granulated sugar, and brown sugar until light and fluffy, 2 to 3 minutes.
- Beat in eggs one at a time, then vanilla.
- Add the dry ingredients and mix just until combined. Fold in most of the white chocolate chips, reserving a small handful.
- Cover and refrigerate the dough for at least 30 minutes, up to 24 hours.
- Preheat oven to 350°F (175°C) and line baking sheets with parchment.
- Scoop chilled dough into balls, spacing a few inches apart. Press a few reserved chips onto the tops.
- Bake 10 to 12 minutes, until edges look set but centers still look slightly underdone.
- Cool on the baking sheet for 5 minutes before transferring to a wire rack.