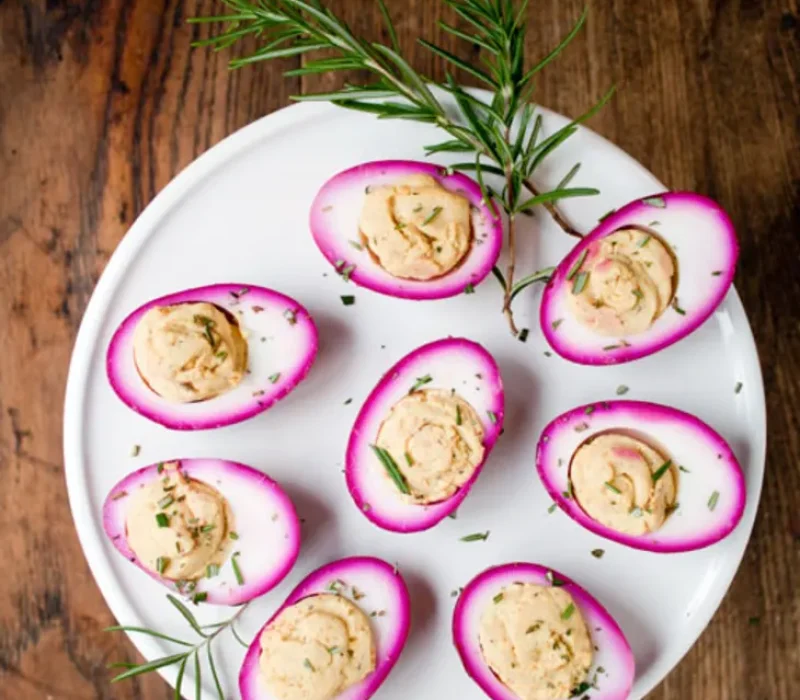
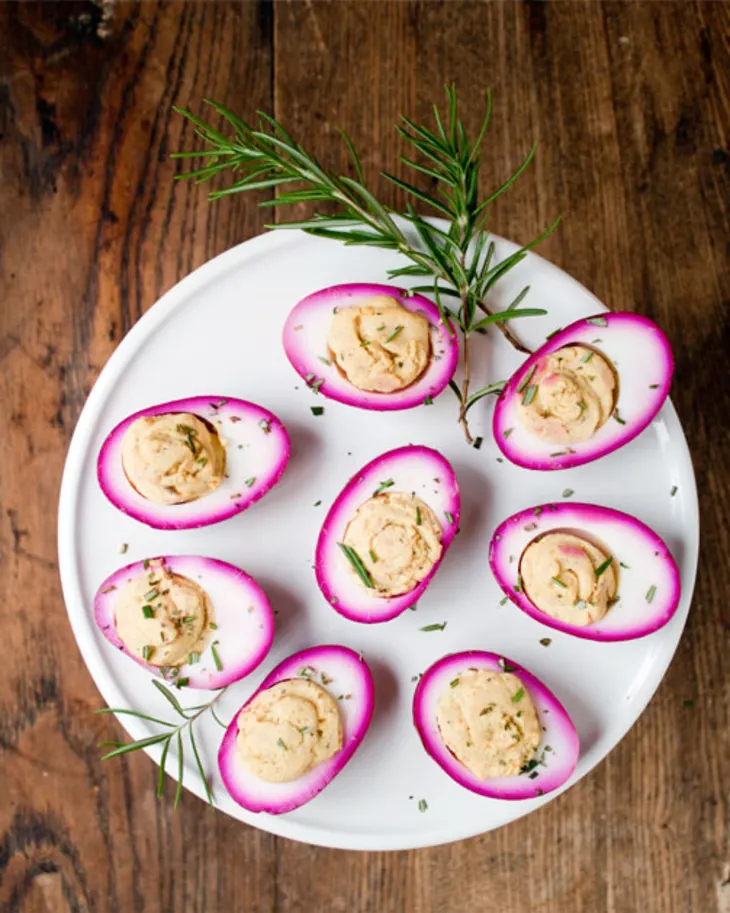
Colored deviled eggs take the creamy, classic appetizer everyone already loves and turn it into the brightest thing on the table. The trick is simple you dye the hollowed egg whites in a quick vinegar and water bath tinted with food coloring, then fill them with the usual smooth, tangy yolk mixture.
The result is a tray of jewel-toned eggs in whatever colors match your party, pastels for Easter, red and green for the holidays, school colors for a graduation, and they taste exactly like the deviled eggs you know. With five main ingredients and about 45 minutes, they are as fun to make as they are to look at.
Key Takeaways
- Dye the hollowed egg whites, not the whole egg, so the color soaks in fast and evenly.
- A teaspoon of vinegar per color bowl helps the dye grip and gives you bolder, deeper color.
- Soak 20 to 30 minutes for vibrant shades, or pull them earlier for soft pastels.
- Fill only after patting the whites completely dry, so the yolk mixture pipes cleanly.
- Because eggs are perishable, keep them chilled and do not leave them out more than 2 hours.
Why You’ll Love These Colored Deviled Eggs
There is a lot to love beyond the color. They are a genuine showpiece that gets people talking, yet they use just five main ingredients and a splash of food coloring. They taste like classic deviled eggs, since the color is only on the whites and does not change the flavor. They are endlessly customizable to any holiday or theme. And they are make-ahead friendly, which is exactly what you want for party day.
What Makes These Different from Colored Deviled Eggs?
The filling and flavor are pure classic. A classic deviled egg is a hard-boiled egg cut in half, with the yolk mashed together with mayonnaise, mustard, and seasoning and piped back into the white. These are made exactly the same way, with one extra step before you fill them, the empty white halves take a short soak in colored water. That is the only difference. You get the same creamy, tangy bite, just wrapped in a bright, eye-catching shell that makes the whole platter feel festive.
Ingredients You’ll Need For Colored Deviled Eggs
A short, familiar list.
- Hard-boiled eggs (9 large), peeled and halved, the base of every deviled egg.
- Mayonnaise (⅓ cup), for a rich, creamy yolk filling.
- Dijon mustard (1 Tbsp), for a zesty, tangy edge that cuts the richness.
- Salt and white pepper (to taste), to season without dark specks in the pale filling.
- Food coloring (3 colors), gel or liquid, to dye the whites in your chosen shades.
- White distilled vinegar (3 tsp, 1 per bowl), which helps the color absorb deeply and evenly.
- Optional toppings: paprika for color and mild smokiness, plus chopped chives or green onion for a fresh, herby finish.
Ingredient Substitutions
| Ingredient | Swap | Notes |
| Mayonnaise | Greek yogurt or half-and-half blend | Lighter and tangier; yogurt adds protein. |
| Dijon mustard | Yellow or whole-grain mustard | Yellow is milder; whole-grain adds texture. |
| Food coloring | Natural dyes (beet, turmeric, cabbage) | See the natural-dye section below. |
| White pepper | Black pepper | Works fine; adds visible flecks. |
| White vinegar | Apple cider vinegar | Slightly fruitier; still helps color set. |
| Paprika | Smoked paprika or Everything seasoning | Adjust the garnish to your taste. |
Equipment You’ll Need For Colored Deviled Eggs
Just a few basics.
- A few small bowls one per color for the dye baths.
- A slotted spoon to lift the dyed whites out without tearing.
- A piping bag or tip for a clean, professional-looking filling.
- A deviled egg tray which keeps the eggs from sliding around.
How to Make Colored Deviled Eggs
The one new skill is the dye bath, and it could not be easier.
1. Boil and peel the eggs. Hard-boil the eggs, then cool them in an ice bath. Peel while they are still slightly warm for the smoothest whites. Slice each egg in half lengthwise and gently scoop the yolks into a bowl.
2. Mix the dye baths. In each of three small bowls, stir together about 1½ cups water, 1 teaspoon white vinegar, and 10 to 20 drops of food coloring. More drops give a bolder color.
3. Soak the whites. Place six egg-white halves in each bowl. Soak for 20 to 30 minutes, checking now and then, until the color is as vibrant as you want. For soft pastels, pull them earlier.
4. Dry the whites. Gently lift the whites out with a slotted spoon and pat them completely dry with paper towels. Dry whites hold the filling better and do not weep color into it.
5. Make the filling. Mash the yolks until smooth, then mix in the mayonnaise, Dijon, salt, and white pepper until creamy. Taste and adjust the seasoning.
6. Fill and garnish. Spoon the filling into a piping bag (or a zip-top bag with a corner snipped off) and pipe it into each colored white. Finish with a sprinkle of paprika and chopped chives if you like.
How Do You Dye the Egg Whites Evenly?
Even color comes down to three things: dye the whites (not the whole egg), use enough coloring, and give them room. Because the halved whites are hollow and porous where the yolk was, they take color quickly and evenly on both sides, which is why this method looks so vibrant compared to dyeing a whole peeled egg.
The teaspoon of vinegar in each bowl lowers the pH and helps the pigment grip the surface, so the color goes deeper and looks bolder. Keep the halves submerged and not crowded, turning them once so no side sits flat against the bowl. If your first batch looks pale, add more drops or soak a little longer; if it looks too intense, shorten the next soak.
Can You Use Natural Food Coloring?
Yes, and it works beautifully for softer, earthy tones. Instead of the dye baths, steep or blend natural ingredients into the water: beet juice for pink and red, turmeric for golden yellow, red cabbage boiled and strained for blue (add a pinch of baking soda to push it bluer), and spinach or matcha for green. Natural dyes usually need a longer soak and give more muted, pastel results than liquid or gel coloring. One note some natural dyes add a very faint flavor, so beet can read slightly earthy and turmeric slightly warm, though it is subtle once the eggs are filled.
Expert Tips for the Best Results
Small details make these look professional.
Peel the eggs under gently running water for the smoothest surface, since nicks show once the whites are dyed. Use gel food coloring for the most saturated jewel tones, or liquid for easy pastels. Pat the whites bone dry before filling so the yolk mixture stays neat and the color does not bleed. Pipe rather than spoon for clean, bakery-style swirls. And chill the filled eggs for 20 minutes before serving so they firm up and travel well.
Common Mistakes (and How to Fix Them)
Most colored-egg issues are easy to avoid.
| Problem | Likely Cause | The Fix |
| Pale, patchy color | Too few drops or short soak | Add more coloring; soak longer; turn the halves. |
| Color bleeds into filling | Whites not dried | Pat completely dry before piping. |
| Torn or dented whites | Peeled roughly or handled hot | Peel under water; cool fully; use a slotted spoon. |
| Rubbery whites | Eggs overcooked | Boil gently; cool promptly in an ice bath. |
| Runny filling | Too much mayo | Add mayo gradually until just creamy. |
Fun Color Themes to Try
The color is where you make them yours.
Go pastel pink, blue, and yellow for Easter and spring, red and green for Christmas, red, white, and blue for the Fourth of July, orange and purple for Halloween, or your team or school colors for a game day or graduation. A single color tray in one bold shade looks striking too. For a full grazing board with a crunchy contrast, set the eggs next to a bowl of my popcorn cauliflower bites.
What to Serve With Colored Deviled Eggs
Deviled eggs are a starter, so surround them with other easy, poppable bites.
They are right at home on a spread with a creamy dip or two, like my honey whipped feta with crackers and a big bowl of Greek hummus platter style dip with veggies for scooping. Round it out with a fruit tray, a cheese board, and something bubbly, and you have an effortless party table.
Perfect for Easter and Spring Gatherings
These eggs practically belong on the Easter table, and they play well with the rest of a spring menu.
Serve them alongside other adorable seasonal bites like my crescent roll carrots, and add a bright vegetable side such as a roasted asparagus side to balance the richer appetizers. Their color does a lot of the decorating for you, so the table looks festive with very little extra effort.
How Do You Store and Make These Ahead?
A little planning makes the party day easy. You can hard-boil the eggs and make the yolk filling up to 3 days ahead, storing each covered in the fridge. The whites can be dyed a day ahead and kept dry and covered. For the freshest look and texture, fill the eggs within a few hours of serving. Store assembled deviled eggs in an airtight container in the fridge for up to 4 days. Do not freeze them, since freezing turns both the whites and the filling watery and rubbery. Because eggs are perishable, follow general safe egg storage guidance: keep them chilled and do not leave them at room temperature for more than 2 hours.
Are Colored Deviled Eggs Healthy?
They are a naturally protein-rich, low-carb bite. Eggs are one of the best sources of high quality protein, with about 6 grams of protein and 70 calories per whole large egg, plus choline, vitamin B12, and vitamin D. Each filled half here lands at roughly 60 calories, most of it from the egg and a modest amount of mayonnaise, with almost no carbohydrate. To lighten them further, swap part or all of the mayo for Greek yogurt, which trims fat and adds a little extra protein. As always, the exact numbers depend on your portions and brands.
Frequently Asked Questions
How do you make deviled eggs vibrant in color?
Soak the peeled, halved egg whites (yolks removed) in a bath of water, a little white vinegar, and food coloring. The hollow whites absorb the color quickly and evenly on both sides. Soak 20 to 30 minutes for bold color or less for pastels, then pat dry before filling. The color sits only on the whites and does not change the taste.
Can I use natural food coloring?
Yes. Beet juice makes pink and red, turmeric makes yellow, boiled red cabbage makes blue, and spinach or matcha makes green. Natural dyes usually need a longer soak and give softer, more muted colors than liquid or gel food coloring, and some add a very faint earthy or warm flavor that is subtle once the eggs are filled.
Does the food coloring affect the taste?
No. Standard food-safe coloring does not change the flavor of the eggs, since it only tints the surface of the whites. Natural dyes can add a very mild taste, like a slight earthiness from beet juice, but it is faint and easy to miss under the creamy filling.
How long should I leave the eggs in the dye?
About 20 to 30 minutes gives bright, vibrant color, and 10 to 15 minutes gives softer pastels. Check every few minutes and pull them when the shade looks right, since color deepens the longer they soak. Gel coloring works faster and bolder than liquid.
Are colored deviled eggs safe for kids?
Yes, as long as you use food safe or natural coloring, they are completely safe for children. Keep them refrigerated until serving and do not leave them out for more than 2 hours, the same food-safety rule that applies to any deviled egg.
Can I make them the night before?
Yes. Dye the whites and make the filling a day ahead, storing them separately in the fridge. For the best look, pipe the filling into the whites within a few hours of serving so the eggs look fresh and the filling stays neat.
Final Thoughts
Colored deviled eggs are proof that one small extra step can transform a familiar favorite. A quick soak in tinted vinegar water turns plain whites into a bright, festive backdrop for the same creamy, tangy filling everyone already reaches for. They are easy, endlessly customizable to any holiday or color scheme, and simple to make ahead, which makes them a spring and Easter go to you will come back to every year. If you make them, I would love for you to leave a rating and a comment below and tell me which colors you chose.
Vibrant Colored Deviled Eggs Recipe
Notes
- 9 large eggs, hard-boiled and peeled
- ⅓ cup mayonnaise
- 1 Tbsp Dijon mustard
- Salt and white pepper, to taste
- Food coloring (3 colors of your choice)
- 3 tsp white distilled vinegar (1 tsp per color bowl)
- Optional: paprika and chopped chives, to garnish
- Hard-boil the eggs, cool in an ice bath, and peel while slightly warm. Halve lengthwise and scoop the yolks into a bowl.
- In 3 small bowls, stir together about 1½ cups water, 1 tsp vinegar, and 10 to 20 drops of food coloring each.
- Soak 6 egg-white halves in each bowl for 20 to 30 minutes, until vibrant. Lift out and pat completely dry.
- Mash the yolks, then mix in the mayonnaise, Dijon, salt, and white pepper until creamy.
- Pipe the filling into each colored white. Garnish with paprika and chives if desired. Chill until serving.
- Dye the whites, not the whole egg, for fast, even color.
- Vinegar helps the color grip; more drops or a longer soak give bolder shades.
- Pat the whites dry so the filling pipes cleanly and the color does not bleed.